Use case
To enhance each of my research projects, I aim to create an all-inclusive compendium and share it through a captivating Quarto website. I am keen on constructing and deploying this website with the seamless integration of GitHub Actions and
Prerequisites
The
RStudio IDE (to code the pipeline) A GitHub account (to be able to use GitHub Actions)
A
Netlify account (to publish the website to)
Step-by-step guide
Here, the steps are given that you must follow to build a Quarto website for the use case. In the next section, you will see how to get the same results fully relying on
Fire up
RStudio and choose File→New Project…→New Directory→Quarto WebsiteFill out the details in the panel, for example like in the figure below, and click on the
Create Projectbutton: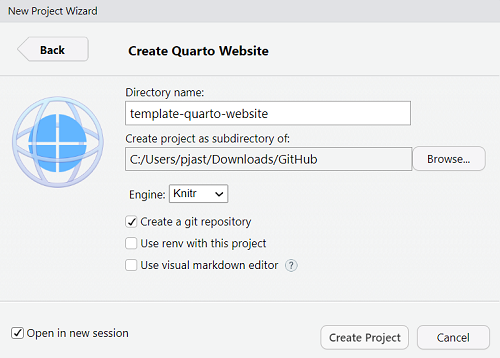
Add a.gitattributesfile and change the RStudio line endings setting toNonealong the lines of my gist about line ending issues with Quarto.ImportantStep 3 does no longer apply. I added this step 3 to my original post to prevent GitHub Actions from failing due to hash issues caused by end-of-line character differences between operating systems (see my gist for more). However, this step 3 is no longer needed since the removal of the hash issue by this pull request.
Execute the
quarto publishcommand forNetlify in the Terminal pane of RStudio: quarto publish netlifyAfter you press
Yto publish with you default account, this automatically creates a_publish.ymlfile in the local repository that looks like the example below, but with the appropriate id and url values for your site:- source: project netlify: - id: d1983ae8-da83-4431-928f-3debf80a02a5 url: 'https://splendorous-bublanina-d544bb.netlify.app'Add the following lines to the
_quarto.ymlfile in order to make sure that code is only executed locally:execute: freeze: auto # Re-render only when source changesFully re-render your site in the Terminal pane:
quarto renderAdd the output directory of your project to .gitignore:
/_site/Go to the Git pane of
RStudio to commit the files created thus far to your local repository: Git→Commit pending changes→ select all files →Stageall files → write aCommit message, for example ‘First commit’ → click theCommitbutton.Execute this command in the Console pane of
RStudio to push your local repo to GitHub: usethis::use_github(private = TRUE)This will create a private remote repository at GitHub. You may change the argument
privatetoFALSEif you want the remote repository to be public right away, or change this manually in the settings section of your GitHub repository at some later moment.Add GitHub Actions to your project by creating the YAML file
publish.ymland save it to.github/workflows/publish.yml:on: workflow_dispatch: push: branches: main name: Quarto Publish jobs: build-deploy: runs-on: ubuntu-latest steps: - name: Check out repository uses: actions/checkout@v2 - name: Set up Quarto uses: quarto-dev/quarto-actions/setup@v2 - name: Render and Publish uses: quarto-dev/quarto-actions/publish@v2 with: target: netlify NETLIFY_AUTH_TOKEN: ${{ secrets.NETLIFY_AUTH_TOKEN }}Configure your GitHub with the credentials required for publishing to
Netlify. This is explained in the Quarto docs. In short: - find/create a personal access token at the
Netlify applications page - go to the remote repository at GitHub →
Settings→Secrets and variables→Actions→ click on the buttonNew repository secret - fill out the name (i.e.
NETLIFY_AUTH_TOKEN) and value of the personal access token
- find/create a personal access token at the
Commit the
publish.ymlfile and subsequently push your local repository (including the_freezedirectory) to GitHub. As a consequence, your GitHub Actions workflow will start running and the website is automatically rendered and published toNetlify. Each subsequent (commit and) push will trigger the GitHub Actions workflow to start running in the same way.
The Quarto website that is described in this example was automatically named https://splendorous-bublanina-d544bb.netlify.app/] by url field in the _publish.yml file accordingly. You can visit the Quarto website at this latter URL.
The remote repository is located at https://github.com/pjastam/template-quarto-website/. Note that this repository is set up as a template, see the section “A versatile template”.
GitHub Actions
Throughout this guide, I have assumed the utilization of a GitHub Actions Runner to execute the job defined by the GitHub Actions workflow. Note that achieving the same outcome is possible without relying on GitHub Actions. More specifically, you can delegate the responsibility of rendering the website to netlify.toml file with the following lines of code:
[[plugins]]
package = "@quarto/netlify-plugin-quarto"
and a package.json file with the following lines of code:
{
  "dependencies": {
    "@quarto/netlify-plugin-quarto": "^0.0.5"
  }
}
Finalize with committing all files to you local repository (step 8) and pushing your local repository to GitHub (step 9). Again, do not execute steps 10-12 in this scenario.
A versatile template
The remote repository that results from the steps described in this step-by-step guide is located at https://github.com/pjastam/template-quarto-website. To use it as a template repository for your Quarto websites, I have checked the Template repository box in the Settings tab of this remote repository. Furthermore, note that the two lines of code with the Netlify credentials (see step 3 of the step-by-step guide) are commented out (i.e. deactivated). In this way, people are guarded from mistakenly using these credentials instead of the Netlify credentials of their own site.
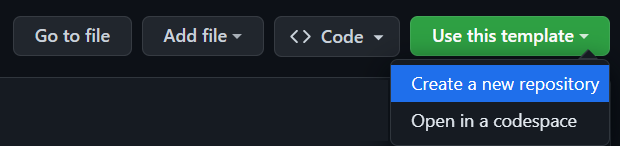
To actually use this template, there are 6 steps involved:
Use my template to create your new repository by clicking this button at the top of the remote repository at GitHub:
Fire up
RStudio, choose File→New Project…→Version Control→Gitand fill out the web URL of your new repository to clone it to your local environment. You can find this web URL at the top of your new repo at GitHub: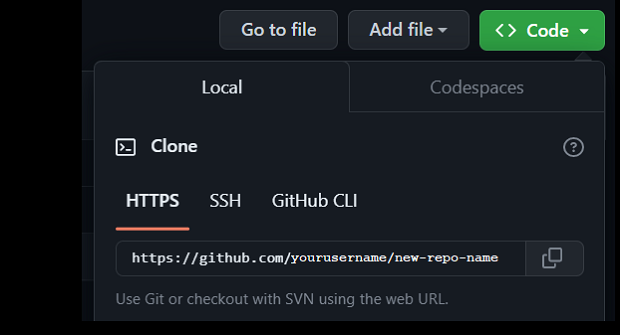
Delete the
_publish.ymlfile from your local repository.Execute step 4 of the step-by-step guide.
CautionBefore continuing with step 5, please double-check that the
_publish.ymlfile in your local repository now contains your ownNetlify credentials. Otherwise the workflow will never run the right way. Execute step 11 of the step-by-step guide.
Execute step 12 of the step-by-step guide.
Your Quarto website will be up and running any moment.
What’s Next?
In this guide, I have created a Quarto website to be used as a research compendium.1 However, the current content is rather limited for this use case. I plan to enhance it with essential compendium components and publish that repository on GitHub in the near future. You can use that as a reference template for your own research compendium, so stay tuned for updates!
1 The Quarto docs about publishing on
Citation
@online{stam2023,
  author = {Stam, Piet},
  title = {GitHub Template for {Quarto} Website on {Netlify}},
  date = {2023-05-29},
  url = {https://www.pietstam.nl/posts/2023-05-29-deploy-site-to-netlify-with-github-actions/},
  langid = {en}
}